Whether we punctured, or simply want to change a tire must know how to remove or change camera is basic.
TOOLS
1 Knockdown. Indispensable to remove or mount a camera without picking.
2 new House. We assume that if we change we need a new camera … right?
FOOTSTEPS …
This is a basic point of the mechanics of our bikes as well by a puncture or a mere change of tire, we will be forced to take the wheel and remove the camera … Cater!
1. First, although very obvious, is to remove the wheel. For this we must loosen the quick release. Today there are several standards in the market, but the mechanism is similar in all of them; we will see later.
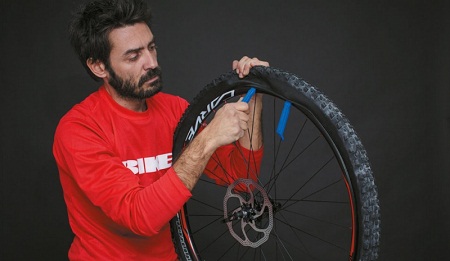
2. Helping a set of removable begin the removal of the cover; being careful not to pinch the tube introduces a removable and secure at the nearest radio. Do the same with other removable 5cm next to the first one. Now, by introducing a third removable, and other 5cm navigating the second rode to fix the latter without any radius along the diameter of the wheel. Only necessary to disassemble a tire sidewall.
3. Extract the camera on the side we have dismantled. If you wear thin remember to unscrew the valve washer fixed to the rim, or can not get the camera.
4. Review the deck throughout the interior with the fingertips in search of some sharp object susceptible to puncture the camera. Also reviews the bottom of the rim.
5. Enter some pressure on the new camera; to take shape will facilitate assembly.
6. Enter the valve first, placing the wheel so that it remains at the highest point. Ensures the valve so that it does not slip.
7. With the valve in the highest point or nearest you (look at the picture) begins to introduce the new camera from top to bottom helping thumbs.
8. The final part may have more difficulty, to provide more resistance. Spin now so you can maneuver better in this area, pasting as possible to you. Generally you can do with your fingers, if not use a removable … I care not to pinch the tube!
9. We can only swell the wheel. Normally the tire manufacturer recommended pressure; check out the flank.
TRICK
. Well footwear Once finished mounting the camera and put adequate pressure in the tire, it is advisable that you make sure that it has trailing well on the rim; look at the flanks sit well on the rim. A bad tire trailing present “buns” rolling. You can spin the wheel while the subject with both hands for lumps.
Meter, take … It sounds very simple but take a wheel can present some complications, particularly the rear. We recommend that you always do with the small pinion meshed mount and when you do it the same way. This change will leave plenty of room for the operation. Ojo also fit well into the caliper disc, this on both wheels, the axle support equally on both sides.