Tubular Tire Removal – A Quick Guide

I was removing some cyclocross tubulars today and (after removing the front tire) I realized that there is a proliferation of information and guides online about gluing tubular tires and about removing glue from tubular rims – but not a lot about actually removing the tires.

So I decided to do something about that!

Some of the reason there is not a lot out there about tubular tire removal is that it really can be pretty simple and the best tool you can have is raw effort. But, it never hurts to apply a few tips along the way, right?

(The photos are large – click for super-size detail view)

Step 1: Where to start –

Give yourself some time; nothing should be done with haste when it comes to tubular tires. If you’re in a hurry to remove them; you’re probably in a hurry to glue them. Gluing “tubi” tires in a hurry results in a garbage glue job and rolled tires.

I like to begin on the opposite side of the wheel from the valve stem and work my way around the wheel using my thumbs to push the tire from the base tape away from the rim.

Tubular removal-01

This may partially be habit from removing clincher tires; but it has practical purposes too. The valve acts as an anchor point in the rim and will cause that portion of the tire to resist being pushed away from the rim.

I start at the point furthest away and work in both directions around the wheel, pushing more of the tire away from the rim as I go.

Once you’ve gone all the way around on one side – flip the wheel around and repeat on the other side; starting opposite the valve stem. You should work both sides until only the center portion of the base tape is still glued to the tire bed of the rim. Continue reading “Tubular Tire Removal – A Quick Guide”

3 Maintenance Tips for Servicing Your Bicycle

Another guest post; this time from Kelly Holmes, from Australia. Kelly offers some good tips here on taking care of your machine. I’m loving the different perspective that these guest posts bring and hope you are too. Learn more about Jamie at the end of the article. Enjoy.

If you have a bicycle that you depend on regularly for exercise or transportation, it is important for you to take good care of your bike so that it will last. There are plenty of things that you can do in order to maintain your bicycle, and taking this time can help improve your bike’s performance and ensure that it will last you for many years. In fact, you might be surprised by just how well your bicycle will work and just how long you can keep it in good condition by performing this regular maintenance, and it only takes a few minutes every once in a while in order to maintain your bike. In fact, these three maintenance tips can work wonders for your bike, and you can perform all of them at home.

Take Care of Your Bicycle’s Chain

Your bicycle’s chain is an essential part of your bicycle, and a rusty or dirty chain can make it difficult for you to ride it. Fortunately, it is easy to take care of your bicycle’s chain. Every now and then, clean any dirt and grime that has accumulated on your chain off, and make sure the chain is well-lubricated. This is one of the most essential parts of keeping your bicycle in top-notch condition.

Check Tire Pressure

Keeping your tires well-inflated can make a world of difference in how easy it is to ride your bicycle. Along with making it easier to pedal, it can also protect your bike’s rims and can make your tires last longer. Over-inflated tires can also cause problems. Fortunately, it is easy to check your bicycle’s tire pressure. The recommended air pressure of your bike’s tires should be printed on the side of the tire, and a simple tire gauge will make it easy for you to check the pressure. Once you have determined how much air is in your tires, you can inflate your tire to the proper pressure. Doing so on a regular basis can make a major difference in your bicycle riding experience and can help prevent damage to your tires. Continue reading “3 Maintenance Tips for Servicing Your Bicycle”

Cheap and Easy Speed?

If you have arrived here looking for stimulants – sorry to disappoint. We don’t do that here: this is a doping free zone.

However; if your search is one of looking for “marginal gains” (as the British Cycling Federation has so famously been quoted lately) I may be of assistance.

I’ve highlighted some articles here before that speak of new testing facilities that have aimed to put some quantitative and objective data behind some of the qualitative speculation many of us cyclists have followed for decades. Most recently; Friction Facts’ founder, Jason Smith in Boulder, Colorado has set about doing just that.

Jason has competed in cycling – most notably as an XTERRA triathlon athlete – and so his interest in marginal gains is a natural one. Once you begin matching yourself against other athletes you observe just how big of a difference a few small percentage points here and there can make over the course of an event. His educational and professional backgrounds in materials engineering and measurement devices respectively also has equipped him with the knowledge to begin to scientifically test and quantify some of the gains that can be had by small changes on your bike.

Here’s a few of his findings:

3-watt difference between two of the most commonly available new chains
1.5w savings by changing pulleys
1+w savings by switching to and from certain pedals
5 w increase in friction when using a popular chain lubricant compared to the factory treatment

Curious to me is the observation that by some of our hap-hazard choices in equipment and maintenance we can cancel out small gains in one area with a poorly informed choice in another. If we use the above examples as an equation: we could have had a 5.5 watt gain if we’d have only used a different chain lubricant. Instead; we are left with an imperceptible 0.5 watt advantage. Similarly; something as simple as correct derailleur pulley selection can save you up to 6 seconds per hour of racing (at 250 watts average). Jason, I am intrigued.

Smith is also interested in developing some products – which he appears to be selling at an almost zero profit margin once you factor in labor – to provide his followers with the advantages he has discovered. One example is his “UltraFast” chain. Ingredients: the fastest chain he has tested (Shimano Dura Ace 7901) which is ultrasonically cleaned and then treated with his custom lubricant blend ( Paraffin wax, pure PTFE Teflon, and molybdenum sulfide). He claims this produces the lowest consistently measurable friction loss of everything he has tested. Hard to argue with that!

The UltraFast treatment is also available as an “Optimizing Service” where he will treat your chain with the same process for $39 (convenient if you use Campagnolo components and the 7901 chain is not compatible with your drivetrain).

Smith views himself as the “Consumer Reports for cyclists” saying: “I buy everything myself – there’s no advertising on the site and I don’t plan on advertising. I hope I can make a little bit of money because I really enjoy doing it.”

I know that I’ll be anxiously awaiting more data from Jason and I would love to test one of his chains one day. You know that if that happens you’ll be sure to read about it here!

Matching Bike Fit to a Second Bike

MULTIPLE BIKE BLUES

If you’re fortunate enough to have multiple bicycles; tell me if this sounds familiar: You have spent endless time and possibly funds perfecting the position on your main bicycle. It’s flawless. You feel like you could ride on it all day, in all conditions without pain – and then get on it again tomorrow and do it all over.

Then you get on the other bike. And, while you’ve taken some measurements and tried to match it up to the first one – stuff still isn’t right. It could be any number of things that you don’t experience on the first bike: Maybe your knees hurt, you have hand numbness, get saddle sores, have after-ride headaches, or just plain don’t feel as strong or fast. Maybe it is something else entirely. Whatever it is, you know something isn’t right in spite of your effort to fix it. What now?

bikes

In a similar post; I gave you an outline of some different bike fit symptoms, what may be causing them, and potentially how to fix it. Ultimately; the underlying theme though was to seek the help of a qualified and professional fitter. I’m going to do a similar thing here: walk through the bike’s contact-points and offer some suggestions; but the help of a professional is still priceless here and many shops offer services to help match the riding position between multiple bikes for less cost than having each one fitted individually.

That said: let’s move on. Bikes can seemingly be set up to fit identically when you measure them; but there are a variety of small details that govern why your body may not be sliding into the same position when you ride the others. Let’s take a look, starting with some standards:

FIRST, ESTABLISH WHAT IS CORRECT; THEN MEASURE AND DOCUMENT IT

Honestly, I could write volumes on measuring a bike to document a riding position. Perhaps if I get enough requests in the comments I’ll actually sit down and outline my process and post it – but you’ll have to be patient because my fitting charts document no fewer than 22 data points and detail is critical because we’re talking about millimeters here… Continue reading “Matching Bike Fit to a Second Bike”

Friday Five; October 26, 2012

Five things you should have done on your 6:00 a.m., 37 F degree, rainy ride back from the auto service center after dropping off your car.

I was reminded of all of these things yesterday morning… 🙂 These are actually good tips for any early-morning fall ride though.Thought I’d share.

Pump your tires up the night before – ’cause you know you don’t have time in the morning.
Wear the winter wind-proof scull cap that covers your ears and not the euro-chic cycling cap. Regardless of how tough you think you are – it’s cold out there!
Wear the wind-proof gloves too. It may be a short ride, but your hands will get cold.
Charge your headlight battery the night before – having your light begin to run low on juice near the end of the ride is not luck; it’s poor planning.
Take your own advice and just do your pre-ride check the night before. I mean come on, Matt – you’re smarter than that! 🙂

It was really cold; I was freezing; and to top it off I also had stolen a few CO2 cartridges out of my seat pack on the last MTB ride I did – so I was riding without any flat-changing capacity at all! In the rain, on tires with lower-than-ideal pressure: a sure recipe for a flat. That’s right; I do stupid stuff too.

Have a great weekend, everyone – and run through that pre-ride check tonight before your ride tomorrow a.m.; o.k.?

Friday Five, October 12, 2012

Five things your bike shop might be getting wrong…

Don’t take me as a hater; I did the bike shop thing for 10 years, I am still one of their biggest advocates, andI run my own independent operation. However – unless you’re one of the rare folks who frequents a bike shop staffed by cyborgs – the mechanics are human and even the good ones make mistakes from time to time. So, this post is not meant as a knock to bike shops; but a guide to help us all stay safe and comfortable.

Here’s what I see most frequently:

Handlebar and shifter position: I saw it again yesterday during a fitting with a new client. The bike had even been “fitted” and the bar was rotated down in such a fashion that I cannot see how he continued riding it as it was (which he isn’t any longer; since we fixed it…) Check my post on this topic to learn how you can see if your bike has the same problem.
Wheel Hub Adjustment: If they get adjusted at all… This is most often missed during assembly – as a lot of assemblies are paid by the bike and it’s a seemingly harmless step to skip that can take quite a while on a tough wheel. When you remove your wheel from the frame, the axle should turn smoothly without any rough feeling and without any wobble or “play” which indicates looseness. Properly adjusted hubs not only turn easier and smoothly but will last longer with less maintenance.
V-Brake Spring Setup (Mountain/Cyclocross Bikes): Also happens most often during assembly and can be missed or skipped in a tune up. The tension springs on the sides which pull the brake arm away from the rim are adjustable and often done wrong in order to center the brakes to the rim. I commonly see the springs tightened until the brakes are centered which results in brake levers that require more effort to engage the brakes and a “stiff” feel overall .

I find better results by backing off the spring tension from the side that is pulling too hard – even off both springs if necessary – to the point where the result is the least amount of spring tension needed to center the brakes. This results in a light and smooth lever feel with nicely centered brakes (which also tend to hold their adjustment longer).
Derailleur Limit Screws: To be frank; if you find a mechanic who can get this right – stick with them. This skill seems to be getting more and more rare.

The limit screws are the two tiny screws on your derailleurs that determine – or limit – how far inward and outward your derailleur can travel during shifting. And, honestly, unless you know what you’re doing you should never touch them. Improper adjustment can lead to damage of wheels, frame, or other components. I most commonly see the front ones improperly adjusted the back is just as susceptible.

Common symptoms are inability to shift to outermost or innermost gears or chronic shifting off the inside or outside of the gear cluster or chainrings. Poor shifting in general may be a symptom as a mechanic may use high cable tension to compensate for shifting off the gear cluster resulting in improper shift indexing (the derailleur won’t line up with the gear correctly).
Cable routing, adjustment, or general setup: Maybe I’m getting lazy for this last one; but this is sort of a catch-all for myriad other problems I see – and this isn’t “Friday 8 or 9…”

~ Shift cables routed to the wrong side of the clamp bolt resulting in incorrect cable pull and poor shifting performance. There is usually a groove under the bolt where the cable should run.
~Cables run with a kink in them will result in excessive friction and sloppy performance in braking or shifting.
~Poor cable routing in the form of too much or too little cable housing increases friction as well. Too long of a cable run increases the amount of housing and the number of “curves” the cable must navigate and increases friction. Too short of a run steepens the radius of the curves in the housing and increases friction. Ideal: the fewest number of gentle and natural curves on the way to the clamp bolt.
~Wrong kind of housing used – most commonly seen when brake housing is used for shift cables. This results in sloppy and often sluggish performance. Brake housing has a radial winding you can usually see under the plastic outer coating while shift housing is linear and often appears perfectly smooth.
~Similar to what’s mentioned in #4 above; cable tension that is set too high or too low to compensate for another set-up issue will result in poor shift indexing or braking that is either vague and sloppy or has no modulation.

Anything you’ve commonly seen done that you were relieved to finally have fixed? Tell us about it and leave a comment.

Post-Bike Ride Checklist

GUILTY OF NEGLECT?

Nick Legan; former Pro Tour mechanic for Team RadioShack, et. al. and a tech writer for velonews.com recently made a great comment in answer to one of the questions from his Ask Nick column. He said:

“…it amazes me how much attention bike racers will give their training, their nutrition and their pre-race routine while ignoring a major part of the equation: their bikes!
What makes a pro team mechanic a pro team mechanic is actually very repetitive in nature: inspection. By paying daily attention to a bike, a good mechanic can prevent virtually all on-the-road problems. ”

While many of us long for the meticulous care of having a pro team mechanic maintain our machines; what we don’t realize is that the biggest difference – systematic inspection – is something that is easy for us to do ourselves. Here I will outline for you the steps that I take after a ride in my quick little inspection to hopefully give you a framework for your own routine. You are more than welcome to use mine, of course.

This routine is meant to be pretty brief – because I know I’m tired after a ride and usually ready to take a shower and start recovery; and I’m sure you’re probably like me in that respect. So these steps shouldn’t require a lot of time and should allow you to put the bike away and get on with your day pretty quickly.

First – go through your mental checklist: If you’re like me; when there is something wrong with my bike that I notice on a ride, it nags me until I get home. Whatever it is: the dragging rear brake cable; rattling valve stem; slow-to-shift derailleur; or loose headset, now is the time to address it. Get to your work area, grab the appropriate tools, and take care of it. You’ll get on the road sooner and safer next time (if you remember to address it at all before that ride…)
Next – Lubricate your Chain: I go into this in depth in my Bike Mistakes Part 2.5 post; so head there next for some tips and recommendations. But now is the best time to do this for a few reasons; among them: a) it helps clean the newly acquired grit off your chain before it really gets stuck to it b) allows the lubricant time to dry or set up so that you and your bike stay cleaner on your next ride and c) gets this necessary task out of the way so you get your ride started sooner next time. You should be doing it anyway – so get in the habit, do it now, and have a cleaner bike in the long run.
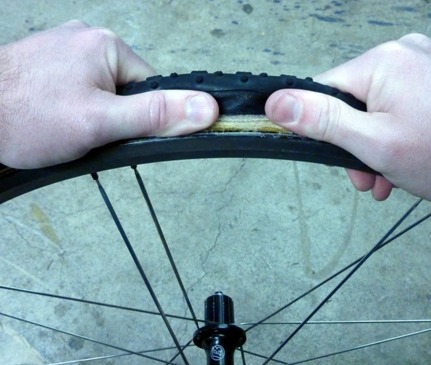
Check your tires for cuts, nicks, and wear: a quick but purposeful spin of the front and rear wheels gets you a good visual inspection to see where staples, glass, or small sharp rocks may be stuck in your tires or where you may have cuts. You’ll often be surprised too where a tire that appeared to be good before the ride has now worn through to the casing (the cloth body of the tire which is under the rubber). For more photos and tips on this specifically; check my post on Worn Tires and Flatting.
Optional: Give it a quick wipe-down: If it’s gotten a little wet, muddy, dirty, dusty or otherwise undesirable – run a rag over it really quick. If you’re feeling industrious; squirt some Pedro’s Bike Lust, ProGold Carbon Care or similar bike polish on it for added shine. You’ll be surprised how much road grime builds up over the course of one ride or a trip down the highway on the roof rack. Wipe it off and your bike will look more like new – which; let’s be honest, will make you more excited about riding it again ( I think I’m going to go wipe my bikes down now…be right back…)
Finally; hang it up: or place it wherever you put your bikes to rest.

Unless I’ve had a particularly difficult adjustment to make on the first step; I’d say this takes me less than 5 minutes most of the time and makes a load of difference on the subsequent rides and when it’s time for an overhaul. My bike is cleaner, quieter, easier to work on and needs less attention. All good things.

Of course; there are times – say after a muddy mountain bike ride or particularly wet or sloppy rain ride or cyclocross race – that your bike will need more cleaning and care. That’s another post for another day; but not to be neglected. A clean bike is a happy bike so take your time and do it right (which means: don’t use pressurized water…)

Do you see anything missing or have a different way of doing things? Share in the comments section so we can all learn from each other.

Pre-Ride Checklist

“PREPPING” AIN’T JUST FOR ZOMBIE ATTACKS…

 I was preparing for a ride the other day when it occurred to me: there’s a lot of things that I just “do” before a ride without thinking about – however they can be rather crucial to the success and enjoyment of the endeavor. A lot of this ritual are things picked up along my journey as a cyclist from others and some of it is because of experiences I have had and developed a way to prevent disaster on subsequent rides. There’s nothing magical about it; but it is actually a little bit of a ritual. That’s good though as it keeps me from missing a step or forgetting to do something before I head out the door.

All told; while it might seem like a lot of steps – it really only takes probably 10 minutes total ( not sure really – I’m not analytic enough to time myself…). The trick to this or any checklist you might develop for yourself is to make it a routine and you’ll soon find yourself accomplishing everything rather quickly and smoothly. So; here’s the details with some description following so you know why I might do what I do – or when I do it.

You might also note that I allude to some post-ride rituals too…I’ll post some on that that soon; but it’s just as important and can be very quick and easy.

PLAN MY ROUTE: I do this for safety’s sake: so I can tell my wife where I’m going since I ride by myself most of the time.
Sometimes I’m more detailed than others – but even if I just have a general direction in mind; that will let the search party zero in on me faster… 🙂 A quick phone call or text to “file my flight plan” also gives her a good idea of when I’ve left and how long I should be gone. If you’re not letting someone know when you ride by yourself – find someone who cares and start. If something happens to you while riding; this could make a big difference.

GET DRESSED: Sometimes the previous step and this one are intermingled…but that’s beside the point. And, this is a worthwhile step to mention because it’s truly part of the preparation. This is where you consider the conditions you’re riding in and what layers are appropriate and how you’ll address a change: i.e. what you’ll do if it starts raining/snowing or if the temperature changes. Are you taking a jacket and will your jersey accommodate it if you need to take it off? Arm warmers instead of long-sleeved jersey? Do you need reflective clothing in case it gets dark? All worth considering.

Also think about how intense your ride will be: for a mellow or recovery ride you’ll want to dress warmer than you would for the more difficult effort of a training ride since your body temperature will be higher with harder efforts.

Finally: out of respect for my wife and her floors…I leave the shoes off until I step into the garage so I don’t mar things up with my cleats. Continue reading “Pre-Ride Checklist”

Do I Need a Bike Fitting?

HOW DO I KNOW?

Driving around town the other day I saw so many people who were so obviously uncomfortable on their bikes (and suffering a loss of efficiency because of their lack of comfort along with other factors).  So, since so much of my material is inspired by my experiences – I was inspired to write another post: A few quick pointers on how to know if you need someone to assess your bike fit.

Several of the signs are pretty obvious: persistent knee pain being the most common.  But there are a few quick and easy signs that something is wrong that aren’t immediately apparent (or that some of you think you just have to live with).  Let’s start at the front of the bike and work our way back.

-Numb hands: Bike fitting can’t always eliminate this issue as sometimes there are some deeper things going on (poor circulation being an obvious one).  But, often this is a marker that something is wrong with your position and your hands are having to do too much of the work of supporting your torso.

bike-fitting

-Can’t comfortably use all or most of your handlebar: I see this one pretty often.  You paid for all of that handlebar, you might as well be able to use all of it that is possible!  All kinds of position errors can limit your access to your handlebar.  If you’re not able to reach all the different positions on the bar, you’re not getting the most out of your bike and not able to change positions enough to enhance your comfort.

-Poor handling characteristics or difficulty descending: There can be many causes to these symptoms ranging from the mechanical to the psychological.  But, a correct position on the bike is not only comfortable, but lets the bike work as it is designed because the rider’s weight is distributed properly.  Handlebar position, stem length, and saddle position can all contribute to fit related causes.

-Locked elbows: Usually mean your handlebar is in the wrong spot.  This makes your bike handle less predictably and often causes soreness in the elbows, shoulders, neck, and possibly elsewhere.  Your bar could be wrong in any direction though: High, low, too close or too far; so consult a pro.

-Sore neck or headaches after riding: Often also an indication of poor handlebar position requiring the rider to hold the head up too far or driving the shoulder blades together. Continue reading “Do I Need a Bike Fitting?”