Friday Five; October 26, 2012

Five things you should have done on your 6:00 a.m., 37 F degree, rainy ride back from the auto service center after dropping off your car.

I was reminded of all of these things yesterday morning… 🙂 These are actually good tips for any early-morning fall ride though.Thought I’d share.

Pump your tires up the night before – ’cause you know you don’t have time in the morning.
Wear the winter wind-proof scull cap that covers your ears and not the euro-chic cycling cap. Regardless of how tough you think you are – it’s cold out there!
Wear the wind-proof gloves too. It may be a short ride, but your hands will get cold.
Charge your headlight battery the night before – having your light begin to run low on juice near the end of the ride is not luck; it’s poor planning.
Take your own advice and just do your pre-ride check the night before. I mean come on, Matt – you’re smarter than that! 🙂

It was really cold; I was freezing; and to top it off I also had stolen a few CO2 cartridges out of my seat pack on the last MTB ride I did – so I was riding without any flat-changing capacity at all! In the rain, on tires with lower-than-ideal pressure: a sure recipe for a flat. That’s right; I do stupid stuff too.

Have a great weekend, everyone – and run through that pre-ride check tonight before your ride tomorrow a.m.; o.k.?

“How To” Series

There’s myriad topics I have happily helped people learn to do themselves in my decade managing bike stores. This series is designed to address some of the toughest and most common. I hope this somewhat limited and unidirectional medium can allow me to help you too!

(If there is no link to the topic; check back soon – it’s coming!)

How to:

Friday Five, October 12, 2012

Five things your bike shop might be getting wrong…

Don’t take me as a hater; I did the bike shop thing for 10 years, I am still one of their biggest advocates, andI run my own independent operation. However – unless you’re one of the rare folks who frequents a bike shop staffed by cyborgs – the mechanics are human and even the good ones make mistakes from time to time. So, this post is not meant as a knock to bike shops; but a guide to help us all stay safe and comfortable.

Here’s what I see most frequently:

Handlebar and shifter position: I saw it again yesterday during a fitting with a new client. The bike had even been “fitted” and the bar was rotated down in such a fashion that I cannot see how he continued riding it as it was (which he isn’t any longer; since we fixed it…) Check my post on this topic to learn how you can see if your bike has the same problem.
Wheel Hub Adjustment: If they get adjusted at all… This is most often missed during assembly – as a lot of assemblies are paid by the bike and it’s a seemingly harmless step to skip that can take quite a while on a tough wheel. When you remove your wheel from the frame, the axle should turn smoothly without any rough feeling and without any wobble or “play” which indicates looseness. Properly adjusted hubs not only turn easier and smoothly but will last longer with less maintenance.
V-Brake Spring Setup (Mountain/Cyclocross Bikes): Also happens most often during assembly and can be missed or skipped in a tune up. The tension springs on the sides which pull the brake arm away from the rim are adjustable and often done wrong in order to center the brakes to the rim. I commonly see the springs tightened until the brakes are centered which results in brake levers that require more effort to engage the brakes and a “stiff” feel overall .

I find better results by backing off the spring tension from the side that is pulling too hard – even off both springs if necessary – to the point where the result is the least amount of spring tension needed to center the brakes. This results in a light and smooth lever feel with nicely centered brakes (which also tend to hold their adjustment longer).
Derailleur Limit Screws: To be frank; if you find a mechanic who can get this right – stick with them. This skill seems to be getting more and more rare.

The limit screws are the two tiny screws on your derailleurs that determine – or limit – how far inward and outward your derailleur can travel during shifting. And, honestly, unless you know what you’re doing you should never touch them. Improper adjustment can lead to damage of wheels, frame, or other components. I most commonly see the front ones improperly adjusted the back is just as susceptible.

Common symptoms are inability to shift to outermost or innermost gears or chronic shifting off the inside or outside of the gear cluster or chainrings. Poor shifting in general may be a symptom as a mechanic may use high cable tension to compensate for shifting off the gear cluster resulting in improper shift indexing (the derailleur won’t line up with the gear correctly).
Cable routing, adjustment, or general setup: Maybe I’m getting lazy for this last one; but this is sort of a catch-all for myriad other problems I see – and this isn’t “Friday 8 or 9…”

~ Shift cables routed to the wrong side of the clamp bolt resulting in incorrect cable pull and poor shifting performance. There is usually a groove under the bolt where the cable should run.
~Cables run with a kink in them will result in excessive friction and sloppy performance in braking or shifting.
~Poor cable routing in the form of too much or too little cable housing increases friction as well. Too long of a cable run increases the amount of housing and the number of “curves” the cable must navigate and increases friction. Too short of a run steepens the radius of the curves in the housing and increases friction. Ideal: the fewest number of gentle and natural curves on the way to the clamp bolt.
~Wrong kind of housing used – most commonly seen when brake housing is used for shift cables. This results in sloppy and often sluggish performance. Brake housing has a radial winding you can usually see under the plastic outer coating while shift housing is linear and often appears perfectly smooth.
~Similar to what’s mentioned in #4 above; cable tension that is set too high or too low to compensate for another set-up issue will result in poor shift indexing or braking that is either vague and sloppy or has no modulation.

Anything you’ve commonly seen done that you were relieved to finally have fixed? Tell us about it and leave a comment.

Specialized Purist Water Bottle Review

Nasty, funky, water bottle.

purist

We’ve all probably had one. That bottle that no matter how much you washed it just wouldn’t seem to come clean or stop stinking like foot. If you’re lucky its just that this bottle seems to always taste like that energy drink you used a while back. Whatever it is; your average water bottle has a tendency to become “funky”.

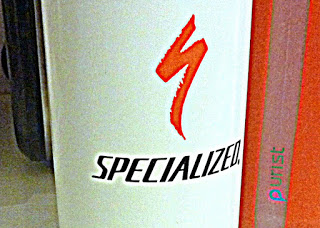
The solution: replace it – you will likely never get that stain or stink out. However, while we used to have to settle for replacing the funk bottle with the same kind of bottle with the same propensity to get nasty. Specialized Bicycle Components has presented a solution though and I think it is a good one.

A GLASS BOTTLE?
purist
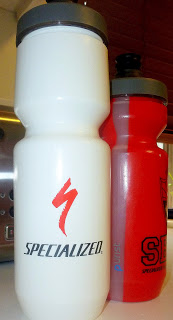
The Purist bottle uses an ultra thin (a few microns if that means anything to you…) layer of food grade silica to isolate whatever you’re putting in the bottle from the plastic it is made out of. This coating is basically like a thin layer of glass and addresses several things;

  1. Isolates your beverage from the plastic of the bottle to keep it from tasting like plastic or whatever was in the bottle before.
  2. Isolates the bottle from the beverage so that the plastic will not pick up the flavor or color of that beverage.
  3. Makes the bottle noticeably easier to clean and keep clean.
Let’s look at each of these points a little closer.
Your average plastic bike bottle often receives complaints about making water and other drinks taste like plastic. I don’t recall noticing this; so perhaps I’ve been drinking out of them for too long or I’m not sensitive enough, but either way I can see where this is undesirable. Since the Purist is essentially glass-coated it is more like drinking out of a glass – not flavoring your drink at all!
Additionally, these bottles can pick up the colors and flavors of some of the drinks that were in them before. I’ve had a few bottles turn a brownish color after I used them for iced tea in the summertime. Additionally, the flavor from a particularly “flavorful” drink will sometimes stick around for a few wash cycles, influencing whatever you may subsequently put in the bottle. This thin glass-like layer also helps prevent these conditions.
Finally, just like things rinse right out of a drinking glass – Specialized says you should be able to simply rinse out the Purist bottle with hot water and be ready to go again. I can say that I tested this for a little while with the first bottle I got – drinking everything from tea, to Hammer Recoverite and Perpetuem, to water and lemonade from that vessel without a single scrubbing or trip through the dishwasher. Not the most scientific test (nor potentially the most sanitary); but I can attest that I had no lingering flavors or coloring and didn’t even get sick! Good enough for me…
WATERGATE AIN’T JUST A HOTEL IN D.C.
sp-purist03Let’s talk quickly about the other new feature: WaterGate. (Will that get me some hits from political searches?)
The no-drip valve has been tried a few times with mixed results. Lately, the hydration system pioneer CamelBak probably had the best success with their Podium bottle. I tried the Podium, but found the valve action to be a little firm for my liking; taking too much effort to open resulting in a harsh stream of water with a similarly harsh closing action.
Specialized seems to have addressed this nicely as well. The WaterGate valve opens and closes more gently – a feature that I think cannot be truly appreciated until you compare the two. Additionally, it seems to live up to its no-drip promise. I have opened the valve and turned the bottle upside down and could seemingly wait minutes without a drip unless I squeezed the bottle. Push the valve down to its locked position and nothing is getting out – a motion that is identical to traditional bottles unlike the twist-lock motion of the Podium which requires you to learn a new habit to lock the bottle.
sp-purist04
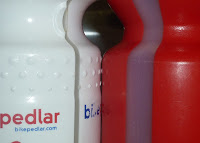
I also really like the “fuel gauge” – a streak of clear material that runs down the side so you can see how much and what is in your bottle (for those days when you have trouble distinguishing between the bottle with the water or energy drink…) For those of us who like bottles with some color as opposed to the clear ones; this is a nice feature I got hooked on with another bottle (which I’ll discuss in a moment) and was happy to see Specialized adapt.
LOOKS GREAT, BUT WHAT’S MISSING?
sp-purist06So, is the Purist the perfect bottle? Nearly. It addresses a lot of the issues many of us have had with our bottles for a long time. And, they’re slowly becoming the majority in my bottle collection. But; with all of the thought that went into these bottles they seemed to miss one important item: 
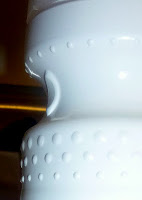
grippy bumps.When Trek re-vamped their bottles a few years ago and added these relatively big bumps to their bottles; I fell in love… and the Trek bottles quickly became my favorites. Truthfully, while working at a Specialized dealer – I would drive 10 minutes to the Trek dealer to buy those bottles at full price because of these bumps.  You see; on a cold and wet day those bumps make the bottle much easier to get out of the bottle cage without fumbling and potentially dropping it.Specialized has had some tiny bumps – just shy of a lightly textured surface – on their bottles for some time but nothing on the scale of the Trek bumps. So – if you’re reading; Specialized – the absence of even these little bumps is a mistake on the Purist bottle. If you think of adding them back; go a step further and make them bigger and you have the perfect bottle!

 sp-purist07
 Do you have a Purist bottle? What do you think? Or, tell us about the nastiest, funkiest bottle you’ve had or seen…

Indoor Trainer Tips & Tricks

SPINNING BUT GOING NOWHERE…

Yes, it’s that time of the year again – and with the cold snaps we often see during the holidays; some of us may be driven off the roads by weather sooner than usual. If you already have a trainer; I’ll try to offer some tips that might be helpful. If you’re shopping for a trainer; here you’ll also find a great guide for what to look for and how to use it for your greatest success. Read on…

SHOPPING? THINGS TO CONSIDER:
1. Quieter is better, but tends to cost more. Aside from the irritation of noise (especially if you’re using it at night and have kids or close neighbors…); a quieter trainer makes it easier to apply some of the tips you’ll read later on. Wind trainers are the loudest. Avoid them if noise is a great concern. Other types of resistance are considerably quieter – but this varies by brand. In general the fluid-type resistance units will be the quietest.
2. Resistance is not futile to think about because different types of resistance units provide different types of resistance. Some require an adjustment function to get different levels of resistance. Others are “progressive” and adjust on their own as you change your own level of intensity. Additionally, wind trainer resistance feels different from magnetic, and different from fluid. Most notably: fluid trainers “warm-up” after a while and you can feel a difference in the resistance. Wind and magnetic trainers are less susceptible to this effect as are highest-quality fluid trainers like the Kinetic Road Machine ($360 at many stores)
3. All trainers are not created equal, but some are closer than you might think. Each company certainly has its strong points. Some, like my favorite brand; Kinetic, are pretty good at everything. Others will have a good stable base, or a clamping mechanism that is easier to use, or a resistance unit that is particularly realistic but may miss a few other details. CycleOps brand trainers are usually well-rounded as well, but aren’t a home-run every time – depending on your needs or wants.
4. Accessories aren’t just for fashionistas. If a salesperson is suggesting a riser-block, trainer mat, trainer tire, a “sweat net” or training videos as a really good idea: chances are they’re not trying to pad a commission check – but instead that they’ve spent enough time on a trainer to have some bad experiences and some good ones. (The good ones usually involve the afore mentioned accessories…by the way…)
Riser blocks level out the bike and can allow the front to be elevated to better replicate a climbing workout. A trainer mat keeps the floor cleaner from sweat, chain oil, and tire residue. Which leads me to trainer tires: which use low-carbon compounds to reduce tread separation and the residue that results from the friction of the roller. Perspiration is corrosive – and if you aren’t one to meticulously maintain your bike (or are just exceedingly proactive), a sweat net (or bike bra as they’re also called) protects your bike’s precious components from corrosion. Finally, training videos bring guidance, distraction and focus to what could just be mindless, aimless and less profitable pedaling.

TIPS FOR A BETTER EXPERIENCE1. Entertainment. As we already suggested above, having something to “distract” you from the fact that you’re pedaling inside, going nowhere, with scenery that isn’t changing can be a great benefit. For seasoned indoor riders, this one is a no-brainer; but may not occur immediately to everyone. Experiment with a few things and you’re likely to find something that works. Old Tour de France stages or great music work well for me. It’s a great time to catch up on your favorite TV series, watch some old favorite movies, listen to podcasts, or whatever your entertainment guilty pleasure may be. Music playlists that change pace, well designed training videos, TV commercial breaks, and movie catch-phrases are also popular interval training triggers to help shake up your session. For example; do a 30 second sprint every time Chris Farley says “schnikies” in Tommy Boy…
2. Don’t burn out. Trainer and indoor miles do not equate to outdoor miles. Don’t worry about trying to keep up your average mileage by replicating it indoor. Depending on intensity; indoor miles can equal 1.5 times or greater the outdoor equivalent. There’s no coasting, no tailwind, no one to draft off of. It is you and your trainer just pounding at each other. Set a time limit and assess your status when you get to the end. 30 minutes is a great place to start if you are new. I find it hard to do less than 45-60 minutes if I’m really focused, but can’t bear to do more than about 90 minutes before my mild A.D.D. kicks in to high-gear and I have to go do something else. If you really have to pile on the time, try doing 2 sessions a day rather than 1 marathon session.
3. Hydrate or die. Well, that’s a little over the top; but keep water or energy drink nearby – especially for the longer sessions. Keep as much fluid nearby as you would on an outdoor ride of the same duration – a bottle an hour is a good guideline. Depending on what your body requires – having some food handy is good thinking as well and sometimes help break the monotony.
4. Create a dedicated space if you can because it will make better use of your time (and reduce the excuses you can use to talk yourself out of it). If you don’t have dedicated space; create a quick set-up plan so you know you can be ready to go in short time and you don’t draw-out your preparation. You’ll end up with more time and energy (and fewer excuses) to ride – which will result it better fitness when spring comes back.
5. A Trainer tire and or wheel saves time and money in the long run. ”Hey, that was in the other section too! You’re cheating. Busted!” Well, it’s a tip too – so there! Many of us ride around on expensive tires most of the year. My main bike is shod with tires which cost $67/wheel! The added heat and friction of trainer use is very hard on tires – wearing them out rapidly.
A trainer tire uses a purpose-specific compound which withstands the friction far better and lasts multiple seasons. The Continental Ultra Home Trainer is a great example ($40 – 45) The result is fresher tires ready to ride (and not in need of replacement) when the weather turns nice. The compound is much cleaner on your roller (and floor) than standard road rubber – which reduces damage and cleaning. Mount your trainer tire on a spare wheel to make wheel-swaps go faster (instead of having to change tires) and you’ll make the transition from outdoor to indoor in less time.

Have any questions? Any other strategies that have worked for you to get more from your trainer time? Share in the comments…

Headlights for Cycling – Are There Better Options?

As I was riding my bike down dark neighborhood streets to my weekly pick-up basketball game last night I got to thinking: Are lighting options for the bike industry keeping pace with other industries?
I had decided to use my NightRider MiNewt light this time as it is now dark enough that I need more than the simple “blinky” I had been using. The MiNewt was a good light for its time and I feel pretty safe with it. Lighting options have improved lately though – getting brighter with longer battery life and some new options. But how do we compare to other industries needing lighting for similar purposes?

I turned to the ATV industry; as I had seen a friend’s setup on his Polaris Ranger and I figured they deal with similar speeds and in the case comparing the needs of lights for mountain biking they encounter similar environments and obstacles.  My search for Polaris Ranger accessories led me to SideBySideStuff.com and particularly to a page for lighting products. Among their respectable selection of lights; the ones I found that mimicked what we see in cycling were the Rigid Industries Dually LED set. Continue reading “Headlights for Cycling – Are There Better Options?”

Post-Bike Ride Checklist

GUILTY OF NEGLECT?

Nick Legan; former Pro Tour mechanic for Team RadioShack, et. al. and a tech writer for velonews.com recently made a great comment in answer to one of the questions from his Ask Nick column. He said:

“…it amazes me how much attention bike racers will give their training, their nutrition and their pre-race routine while ignoring a major part of the equation: their bikes!
What makes a pro team mechanic a pro team mechanic is actually very repetitive in nature: inspection. By paying daily attention to a bike, a good mechanic can prevent virtually all on-the-road problems. ”

While many of us long for the meticulous care of having a pro team mechanic maintain our machines; what we don’t realize is that the biggest difference – systematic inspection – is something that is easy for us to do ourselves. Here I will outline for you the steps that I take after a ride in my quick little inspection to hopefully give you a framework for your own routine. You are more than welcome to use mine, of course.

This routine is meant to be pretty brief – because I know I’m tired after a ride and usually ready to take a shower and start recovery; and I’m sure you’re probably like me in that respect. So these steps shouldn’t require a lot of time and should allow you to put the bike away and get on with your day pretty quickly.

First – go through your mental checklist: If you’re like me; when there is something wrong with my bike that I notice on a ride, it nags me until I get home. Whatever it is: the dragging rear brake cable; rattling valve stem; slow-to-shift derailleur; or loose headset, now is the time to address it. Get to your work area, grab the appropriate tools, and take care of it. You’ll get on the road sooner and safer next time (if you remember to address it at all before that ride…)
Next – Lubricate your Chain: I go into this in depth in my Bike Mistakes Part 2.5 post; so head there next for some tips and recommendations. But now is the best time to do this for a few reasons; among them: a) it helps clean the newly acquired grit off your chain before it really gets stuck to it b) allows the lubricant time to dry or set up so that you and your bike stay cleaner on your next ride and c) gets this necessary task out of the way so you get your ride started sooner next time. You should be doing it anyway – so get in the habit, do it now, and have a cleaner bike in the long run.
Check your tires for cuts, nicks, and wear: a quick but purposeful spin of the front and rear wheels gets you a good visual inspection to see where staples, glass, or small sharp rocks may be stuck in your tires or where you may have cuts. You’ll often be surprised too where a tire that appeared to be good before the ride has now worn through to the casing (the cloth body of the tire which is under the rubber). For more photos and tips on this specifically; check my post on Worn Tires and Flatting.
Optional: Give it a quick wipe-down: If it’s gotten a little wet, muddy, dirty, dusty or otherwise undesirable – run a rag over it really quick. If you’re feeling industrious; squirt some Pedro’s Bike Lust, ProGold Carbon Care or similar bike polish on it for added shine. You’ll be surprised how much road grime builds up over the course of one ride or a trip down the highway on the roof rack. Wipe it off and your bike will look more like new – which; let’s be honest, will make you more excited about riding it again ( I think I’m going to go wipe my bikes down now…be right back…)
Finally; hang it up: or place it wherever you put your bikes to rest.

Unless I’ve had a particularly difficult adjustment to make on the first step; I’d say this takes me less than 5 minutes most of the time and makes a load of difference on the subsequent rides and when it’s time for an overhaul. My bike is cleaner, quieter, easier to work on and needs less attention. All good things.

Of course; there are times – say after a muddy mountain bike ride or particularly wet or sloppy rain ride or cyclocross race – that your bike will need more cleaning and care. That’s another post for another day; but not to be neglected. A clean bike is a happy bike so take your time and do it right (which means: don’t use pressurized water…)

Do you see anything missing or have a different way of doing things? Share in the comments section so we can all learn from each other.

Soma Steel Core Tire Levers

If you’re thinking about taking up cycling as a hobby or as part of a training regime with a view to compete, you need to make sure you’re properly equipped. Cycling has some different requirements to other sports, and a standard t-shirt and shorts combination probably won’t cut it if you want to do it properly. So, what do you need in your kit if you’re going to make it big in the world of cycling?

Of course, the first thing you need is a good bike. It’s important that this is the right size for you. While it can be OK to buy a cheap second hand bike, you need to make sure it isn’t too big or small before you agree to buy it. Going to a specialist bike shop may mean spending more on your bike, but you will know that it suits your size perfectly, so it will be perfectly safe and comfortable to ride and won’t cause any injuries from being the wrong size or shape for your body. If you would like to control your body while you cycling at that time your have to select very good cycle parts and accessories like soma tire levers.

The second most important part of your cycling kit will be what you choose to wear. Cycle jerseys are the perfect option for a streamlined, cycle-friendly top. They tend to be tight-fitting and made from specialist fabrics so that they won’t slow you down, and they come in a range of designs to suit your style. Cycle shorts come in a variety of lengths, from hotpants to full leg length, and tend to be weatherproof and suitable for all seasons. Loose clothing might catch in the wheels, so try to avoid it. Continue reading “Soma Steel Core Tire Levers”

Swiftwick Socks: Tested

SOCKS? REALLY?
I am actually amazed at the amount of gear that I have had for a long time that I have never written about. To say the least – it’s been a busy few years and I haven’t been writing as much as I would have liked. My Swiftwick socks certainly fall into that category.

My experience with Swiftwick socks goes back quite some time. If I had to guess I would say it was sometime around 2005 or 2006 when one of the owners of the company walked into the bike shop I was running in Brentwood, Tennessee (suburb South of Nashville and Swiftwick’s home town). He handed me a sample set  claiming they’d be the best socks I’d ever worn and said he’d check back in a few weeks to see how I like them. Well, long story short (’cause I can be long-winded); I still own the socks, they get regular use, and not only are they still holding up but they are among my favorites. Additionally; I have spent a decent amount of my own  money acquiring more (the photo above is just the pairs that aren’t in the laundry at the time…and there are 6-pair pictured.)

socks-0001

THE DETAILS
So what’s the deal? What makes these so great? Well, as much as I’d like to start off with materials and technobabble – I think what is at the core of the greatness here is good old fashioned attention to detail.

They get the small stuff right. Seam placement; compression; cuff height (and options of cuff heights); bulk and weight of material; durability; and last but not least: fit – all of these are qualities that I would praise in every one of my socks from the Mid-South brand. Every single one of these qualities lends toward a sock that doesn’t have “hot spots” in the shoe, will support your foot and the many muscles and bones within, and provides proper cushion and protection for a variety of activities. I have run, played soccer and basketball, skied, gone on road and mountain bike rides – heck; I even hiked the Great Wall of China – while wearing these socks and I am convinced that my feet felt better than if I’d have worn something else. Continue reading “Swiftwick Socks: Tested”

Cyclocross Tips Series

I get a lot of traffic looking for info on Cyclocross. Fitting, tires, and other set up tips are among just some of the topics that bring people here.

So, with that in mind; I have compiled all of my ‘cross posts in one place and will be adding more as time progresses. So – here you go: one stop shopping!

If you have questions or suggestions for a topic; leave it in the comments and I’ll address it as best I can. Thanks for your loyal reading! Continue reading “Cyclocross Tips Series”